Discord 斜杠命令
Discord 有一个名为 **斜杠命令** 的新功能。它们允许您键入 / 后跟命令名称来执行某些操作。例如,您可以键入 /giphy cats(内置命令)来获取一些猫的 GIF。
Discord 斜杠命令通过在有人发出命令时向 URL 发出请求来工作。您不需要您的应用程序一直运行才能使斜杠命令工作,这使得 Deno 部署成为构建此类命令的完美解决方案。
在这篇文章中,让我们看看如何使用 Deno 部署构建一个 hello world 斜杠命令。
步骤 1: 在 Discord 开发者门户网站上创建一个应用程序
- 访问 https://discord.com/developers/applications(如果需要,使用您的 Discord 帐户登录)。
- 点击您个人资料图片左侧的新建应用程序按钮。
- 为您的应用程序命名,然后点击创建。
- 转到机器人部分,点击添加机器人,最后点击是的,就这样做!以确认。
就是这样。一个新的应用程序已创建,它将包含我们的斜杠命令。不要关闭该选项卡,因为在整个开发过程中,我们需要从该应用程序页面获取信息。
步骤 2: 在 Discord 应用程序中注册斜杠命令
在编写代码之前,我们需要使用 curl 命令调用 Discord 端点,以在我们的应用程序中注册斜杠命令。
将BOT_TOKEN替换为机器人部分中提供的令牌,将CLIENT_ID替换为页面常规信息部分中提供的 ID,并在您的终端上运行该命令。
BOT_TOKEN='replace_me_with_bot_token'
CLIENT_ID='replace_me_with_client_id'
curl -X POST \
-H 'Content-Type: application/json' \
-H "Authorization: Bot $BOT_TOKEN" \
-d '{"name":"hello","description":"Greet a person","options":[{"name":"name","description":"The name of the person","type":3,"required":true}]}' \
"https://discord.com/api/v8/applications/$CLIENT_ID/commands"
这将注册一个名为hello的斜杠命令,该命令接受一个名为name的字符串类型参数。
步骤 3: 在 Deno Deploy 上创建并部署“Hello World”斜杠命令
接下来,我们需要创建一个服务器,以便在 Discord 使用 POST 请求发送用户的斜杠命令时进行响应。
-
导航到 https://dash.deno.com/new,然后点击游乐场卡片下的播放。
-
在下一页的编辑器中,点击顶部菜单中的设置图标。在弹出的模态框中,选择+ 添加变量。
-
将
DISCORD_PUBLIC_KEY作为 KEY 输入。VALUE 应为 Discord 应用程序页面常规信息部分中提供的公钥。 -
将以下代码复制并粘贴到编辑器中
// Sift is a small routing library that abstracts away details like starting a
// listener on a port, and provides a simple function (serve) that has an API
// to invoke a function for a specific path.
import {
  json,
  serve,
  validateRequest,
} from "https://deno.land/x/sift@0.6.0/mod.ts";
// TweetNaCl is a cryptography library that we use to verify requests
// from Discord.
import nacl from "https://cdn.skypack.dev/tweetnacl@v1.0.3?dts";

// For all requests to "/" endpoint, we want to invoke home() handler.
serve({
  "/": home,
});

// The main logic of the Discord Slash Command is defined in this function.
async function home(request: Request) {
  // validateRequest() ensures that a request is of POST method and
  // has the following headers.
  const { error } = await validateRequest(request, {
    POST: {
      headers: ["X-Signature-Ed25519", "X-Signature-Timestamp"],
    },
  });
  if (error) {
    return json({ error: error.message }, { status: error.status });
  }

  // verifySignature() verifies if the request is coming from Discord.
  // When the request's signature is not valid, we return a 401 and this is
  // important as Discord sends invalid requests to test our verification.
  const { valid, body } = await verifySignature(request);
  if (!valid) {
    return json(
      { error: "Invalid request" },
      {
        status: 401,
      },
    );
  }

  const { type = 0, data = { options: [] } } = JSON.parse(body);
  // Discord performs Ping interactions to test our application.
  // Type 1 in a request implies a Ping interaction.
  if (type === 1) {
    return json({
      type: 1, // Type 1 in a response is a Pong interaction response type.
    });
  }

  // Type 2 in a request is an ApplicationCommand interaction.
  // It implies that a user has issued a command.
  if (type === 2) {
    const { value } = data.options.find((option) => option.name === "name");
    return json({
      // Type 4 responds with the below message retaining the user's
      // input at the top.
      type: 4,
      data: {
        content: `Hello, ${value}!`,
      },
    });
  }

  // We will return a bad request error as a valid Discord request
  // shouldn't reach here.
  return json({ error: "bad request" }, { status: 400 });
}

/** Verify whether the request is coming from Discord. */
async function verifySignature(
  request: Request,
): Promise<{ valid: boolean; body: string }> {
  const PUBLIC_KEY = Deno.env.get("DISCORD_PUBLIC_KEY")!;
  // Discord sends these headers with every request.
  const signature = request.headers.get("X-Signature-Ed25519")!;
  const timestamp = request.headers.get("X-Signature-Timestamp")!;
  const body = await request.text();
  const valid = nacl.sign.detached.verify(
    new TextEncoder().encode(timestamp + body),
    hexToUint8Array(signature),
    hexToUint8Array(PUBLIC_KEY),
  );

  return { valid, body };
}

/** Converts a hexadecimal string to Uint8Array. */
function hexToUint8Array(hex: string) {
  return new Uint8Array(
    hex.match(/.{1,2}/g)!.map((val) => parseInt(val, 16)),
  );
} -
点击保存并部署以部署服务器
-
注意文件部署后项目的 URL。它将位于编辑器的右上角,并以
.deno.dev结尾。
步骤 3: 配置 Discord 应用程序以使用我们的 URL 作为交互端点 URL
- 返回 Discord 开发者门户网站上的应用程序(Greeter)页面
- 在交互端点 URL字段中填写上面的 Deno Deploy 项目 URL,然后点击保存更改。
应用程序现在已准备就绪。让我们继续下一部分来安装它。
步骤 4: 在你的 Discord 服务器上安装 Slash 命令
为了使用 hello Slash 命令,我们需要将我们的 Greeter 应用安装到我们的 Discord 服务器上。以下是步骤:
- 前往 Discord 开发者门户网站上 Discord 应用页面中的 OAuth2 部分。
- 选择
applications.commands范围,然后点击下面的 复制 按钮。 - 现在将 URL 粘贴到你的浏览器中并访问它。选择你的服务器,然后点击 授权。
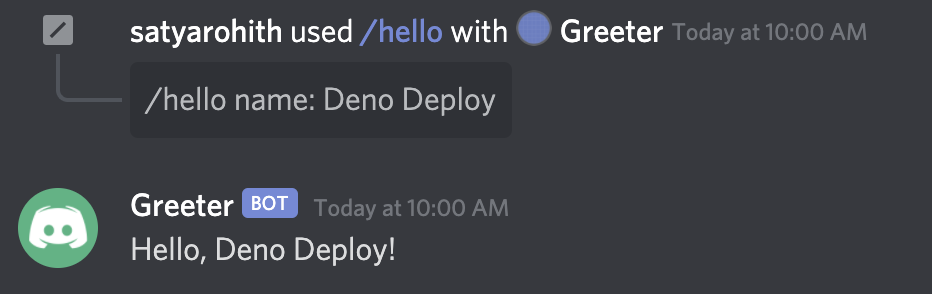
打开 Discord,输入 /hello Deno Deploy 并按 回车。输出将类似于以下内容。
恭喜你完成了本教程!现在你可以开始构建一些很棒的 Discord Slash 命令了!并且请在 Deno Discord 服务器 的 deploy 频道与我们分享你的作品。